
Overview
Workflows in Perspio let you monitor asset data and trigger automated outcomes (Actions) when defined Conditions are met. This article walks you through the end-to-end Workflow Creation Wizard: Details → Scope → Condition → Schedule → Actions → Summary.
Use this guide when you need to create a new workflow from scratch, regardless of whether it runs continuously, on an event, periodically, or on a schedule.
Who this is for
Users who have access to the Workflows module and need to:
-
Create a new workflow
-
Choose what assets it applies to (Scope)
-
Define the logic that triggers it (Condition)
-
Control when it monitors (Schedule)
-
Define what happens when it triggers (Actions)
Before you start
-
Confirm you can access Workflows from the left navigation.
-
Have clarity on:
-
What you want to detect (Condition)
-
Which assets should be evaluated (Scope)
-
When it should run (Schedule)
-
What should happen when triggered (Actions)
-
Step 1 – Open the Workflows list and start a new workflow
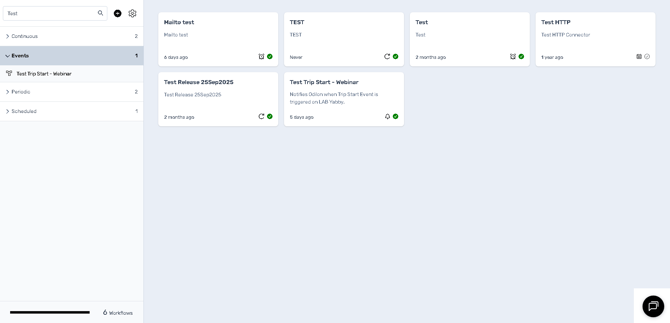
From the Workflows landing page, you can review existing workflows and create a new one.
What you see on the Workflows list
-
Search (top-left) to quickly find workflows by name.
-
Workflow type filters in the left panel (e.g., Continuous, Events, Periodic, Scheduled) with counts to show how many exist in each category.
-
Workflow cards in the main area showing each workflow’s name, description (if provided), and recency (e.g., “6 days ago”), plus status/quick controls.
How to create
-
Select the Add / + control to open the Add Workflow Wizard.
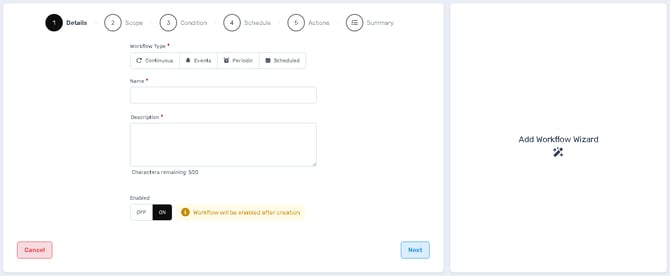
Step 2 – Details (name, type, description, enablement)
This step defines the workflow’s identity and how it behaves at a high level.
Screen controls
-
Workflow Type (required):
-
Continuous – continuously evaluates matching assets.
-
Events – evaluates when a supported event is received/raised.
-
Periodic – evaluates on a repeating interval (e.g., every X minutes/hours) depending on configuration.
-
Scheduled – evaluates during defined schedule windows (often paired with more strict timing controls).
-
-
Name (required): Clear, unique, and descriptive.
-
Description (required): Supports up to 500 characters (counter shown).
-
Enabled toggle:
-
ON/OFF determines whether the workflow is enabled after it is created.
-
The UI indicates: “Workflow will be enabled after creation” (meaning this toggle is applied once you finish the wizard and save).
-
Navigation controls
-
Cancel exits without saving.
-
Next advances to Scope.
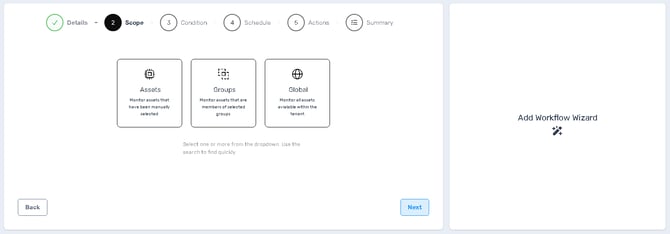
Step 3 – Scope (which assets are evaluated)
Scope determines what set of assets the workflow evaluates.
Scope options
-
Assets – monitor a manually selected set of assets.
-
Groups – monitor assets belonging to selected group(s).
-
Global – monitor all assets available within the tenant.
When Global is selected, the wizard confirms that the workflow evaluates all assets with no filter.
Screen controls
-
Click a scope tile to select it (selected tile shows a visual highlight/check).
-
Back returns to Details.
-
Next proceeds to Condition.
Step 4 – Condition (define what triggers the workflow)
The Condition step is where you build the IF logic.
Core layout
-
The condition line starts with If
-
You select:
-
a Signal (what field/telemetry you want to evaluate)
-
an Operator (how to compare)
-
a Value (what to compare against), when applicable
-
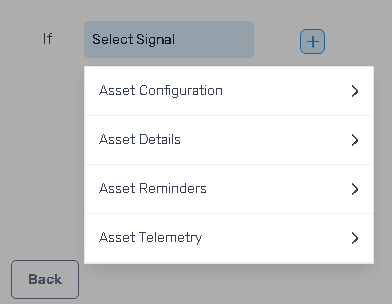
Selecting a Signal
Selecting Select Signal opens a categorised menu. In the example shown, signals are grouped as:
-
Asset Configuration
-
Asset Details
-
Asset Reminders
-
Asset Telemetry
This structure helps you locate signals based on whether they are static metadata (details/configuration) or dynamic inputs (telemetry).
Selecting an Operator
After choosing a signal (example: Asset Name), the Select Operator dropdown provides comparison options. For text-based fields, typical operators include:
-
Contains / Not Contains
-
Starts With / Not Starts With
-
Ends With / Not Ends With
-
Equal to / Not equal to
-
Is Changed / Not Changed (useful for “on change” style triggers)
The operator list includes a Search bar to quickly filter operators.
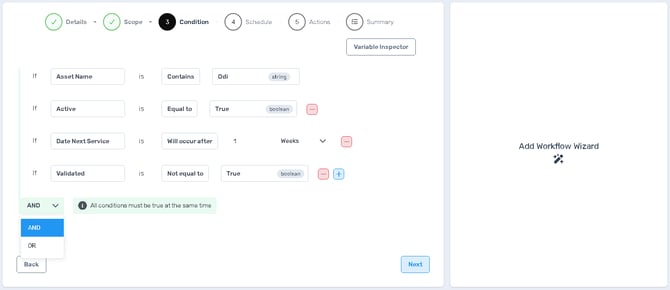
Building more complex logic:
-
Use the + button beside the condition row to add additional conditions (e.g., multiple clauses).
-
Use Variable Inspector (top-right) to review and insert available variables where supported (especially useful when you need dynamic values in conditions or actions).
Navigation controls
-
Back returns to Scope.
-
Next proceeds to Schedule.
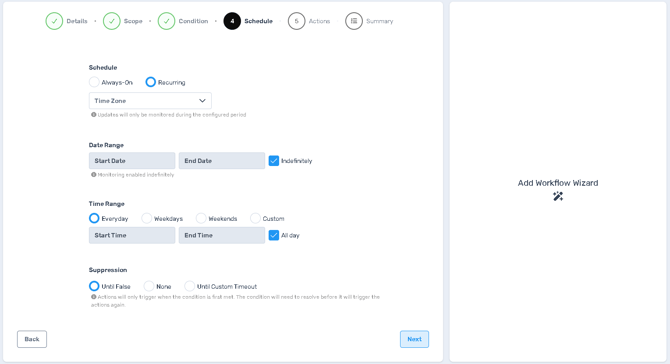
Step 5 – Schedule (when monitoring occurs)
Schedule controls when Perspio monitors for the condition and how often it can trigger.
Schedule modes
-
Always-On – monitoring runs continuously.
-
Recurring – monitoring runs only during the configured date/time windows.
Screen controls (Recurring)
-
Time Zone dropdown: ensures “start/end time” aligns with the intended local time.
-
Date Range:
-
Start Date
-
End Date
-
Indefinitely checkbox (when enabled, monitoring continues without an end date)
-
-
Time Range:
-
Everyday
-
Weekdays
-
Weekends
-
Custom
-
All day checkbox (when enabled, start/end time fields are not required)
-
-
Suppression (controls repeat triggering behaviour):
-
Until False – triggers once when condition becomes true; won’t trigger again until it resolves (returns false) and becomes true again.
-
None – no suppression (may trigger repeatedly depending on evaluation behaviour).
-
Until Custom Timeout – suppresses triggers for a defined time window (used to prevent alert storms).
-
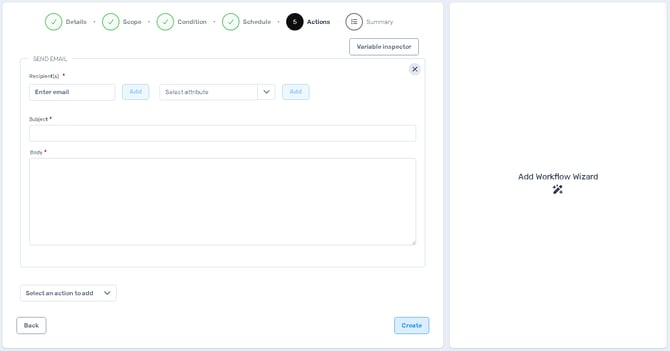
Step 6 – Actions (what happens when the condition is met)
Actions define the outcome(s) when the workflow triggers (e.g., send notifications, call connectors, update records).
This article focuses on where actions are configured in the wizard and the purpose of each control. For detailed action behaviour and configuration patterns, refer to Workflows Module – Actions.
Action configuration areas (examples shown)
-
SEND SMS
-
Recipient(s) (required): add a phone number directly and/or insert a recipient via attribute.
-
Country selector (e.g., AU) controls SMS formatting/region.
-
Message (required): character counter shown (e.g., 320).
-
Remove action (X) in the top-right of the action block.
-
-
SEND EMAIL
-
Recipient(s) (required): enter email and/or use an attribute.
-
Subject (required)
-
Body (required)
-
Remove action (X) in the top-right of the action block.
-
-
Variable Inspector: helps insert available variables into message/subject/body fields.
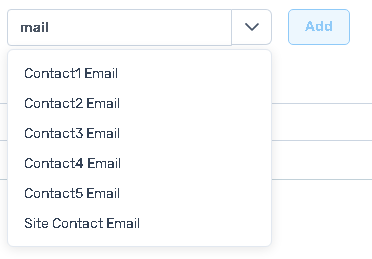
Using attributes for recipients (dynamic routing)
Instead of hardcoding recipients, you can select an attribute source (example shown: Contact) and choose from available fields such as:
-
Contact1 Email / Name / Phone
-
Contact2 Email / Name (and so on)
This supports workflows that notify the right contact based on asset/customer data rather than a fixed list.
Adding more actions
Use Select an action to add to append additional actions to the workflow (the available list depends on your tenant configuration and enabled connectors). Only 3 Actions
Saving
-
When required fields are satisfied, use Create to save the workflow.
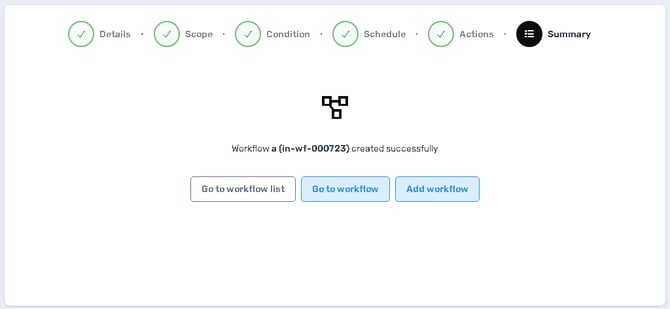
Step 7 – Summary (confirmation and next steps)
After creation, the Summary screen confirms success and provides quick navigation options.
What you can do next
-
Go to workflow list – return to the full list to validate placement and status.
-
Go to workflow – open the workflow you just created for review.
-
Add workflow – start creating another workflow immediately.
A success toast confirms the save (e.g., “Data saved successfully”).
Validation checklist (recommended)
After creating a workflow:
-
Confirm Enabled status is correct (ON if you want it running).
-
Confirm Scope matches expectations (Global vs specific assets/groups).
-
Confirm Condition is specific enough to avoid false positives.
-
Confirm Schedule + Suppression prevents alert storms and matches business hours.
-
Confirm Actions use the correct recipients (direct vs attribute-driven) and content.
Related Workflows articles
-
Workflows Module – Workflow Types (Continuous vs Events vs Periodic vs Scheduled)
-
Workflows Module – Actions (use this as the reference for configuring action types and best practices)