
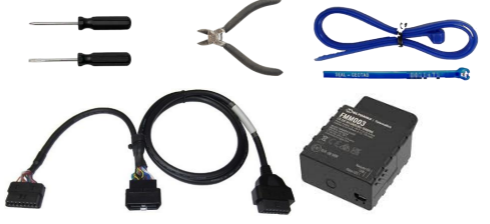
Tools Needed
Flat + Phillips screwdrivers + Side-cutters/ pliers + Cable ties + Teltonika FMM003 + T-harness fittings used in all vehicle types. Locate the relevant fitting for your installation shown in the image below. Please discard any other fittings not used in this install.
FYI: Expect installation to take approx. 30mins.
Preparation
Read important safety information and limits of use following these installation instructions.
Please read and follow all instructions and warnings to prevent serious injury and/or vehicle damage.
Please do not attempt to install, rearrange/change, or remove any product from a vehicle while the vehicle is not stationary or otherwise in operation. All installation, setup, or removal must be completed only in stationary vehicles which are securely parked.
Servicing devices while the vehicle is in transit could result in failures of the device or sudden unplanned events/crashes which could lead to death or serious personal injury.
Please switch ignition OFF before commencing the installation of the unit.

When possible, carry out the install process outdoors to further engage the GPS location/device calibration.
***Please record the Teltonika serial number and target vehicle plant number prior to installation***
Example serial number: 863259073285620
Step 1
Please locate the vehicle’s engine diagnostic port, typically found in the driver’s area at or below knee level.
Find 16 pin OBD port (diagnostic port) and unscrew/unclip it from the mounting bracket.


***May vary slightly by vehicle make and model***
Step 2
Identify the correct fitting/adaptor for the vehicle you are about to install. Proceed to fit the short female end of the t-harness cable connector using the c-clips supplied. Once complete, screw or snap back into place of the original OBD port.

Step 3
Plug the short male t-harness connection end into the vehicle’s existing 16 pin OBD port and then zip tie both ends together.


Step 4
Plug the Teltonika device into the remaining female connector end. Switch ignition ON. You will hear 6 quick beeps, and then all three lights on the device will flash.

Ensure that the vehicle is parked outdoors to locate satellites and vent exhaust fumes. Start the vehicle and allow it to run for approximately 3 minutes. Start the vehicle and allow it to run for approximately 3 minutes. During this period, you will notice the Green LED power ON glowing face of the device.
Step 5
Once all two LED lights have lit up, secure your device using the supplied cable tie.
First, use the cable ties supplied to secure the device to the harness. Repeat process whereby the original harness connects the t-harness to ensure that the power cannot be disconnected or tampered with by any means.

Now, use cable ties (of any type) to secure the device to a ridged part under the dash, that moves only with the chassis of the vehicle. If the device moves separately from the chassis, false / positives can be reported.
Ensure the t-harness is also secured under the dash out of harm’s way.
Step 6
Please verify that the device is communicating correctly. Using a PC or smartphone, navigate to Perspio, log in, search for the IMEI on Assets and wait for it to locate
Step 7
You will now see a screen that displays the current status of the device. If the device is communicating correctly, you will see GREEN lettering with the last valid GPS record. If the text appears in RED, the device is unable to communicate, and you must verify the installation.
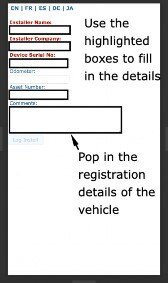
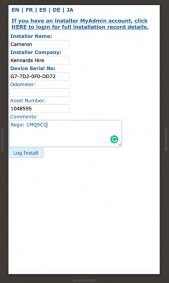
Unactioned Form: Example filled in Form:
Successful Form: Unsuccessful Form:


Please send an email to servicedesk@perspio.io to confirm device has been installed and is fully activated, or if you have any issues in this process.
Quality Install Examples

WARNING!
All in-vehicle devices and related cabling must be securely fastened and kept clear of all vehicle controls, including gas, brake and clutch pedals. This requires the use of a cable tie when securing the device or any extension harness to the OBD connector, securing both sides of the harness. If you do not use a cable tie, vibration in the vehicle can lead to a loose connection which could indirectly cause the vehicle’s engine computer to fail, loss of vehicle control and cause serious injury. Inspect devices and cabling regularly to ensure all devices and cables remain securely attached.
WARNING!
If at any point after an in-vehicle device is installed a warning light up on the vehicle dash or the vehicle stalls or has a marked drop in performance, shut off the engine, remove the device, and contact your reseller. Continuing to operate a vehicle with these symptoms can cause loss of vehicle control, and serious injury.
Refer to this article for more information
Refer to this video for more information
Checking Perspio for Asset Connectivity
Access Perspio, search for the serial number and ensure that the asset displays last communication date and time.
To do that, click on the Eye Icon under the search bar:

The Last Seen Pop Up will indicate the latest date and time the device communicated with Perspio. If it aligns with the time you finished the installation, that means the asset is up and running.
Keep an eye on trips and Events for alerts and possible installation faults.