
Overview
This article explains how to add a link to an asset in the Perspio Inspector module.
Adding a link is a useful way to share important information directly on the asset record, so users can quickly access supporting resources without leaving the asset context.
Examples include:
-
Manufacturer manuals
-
Service guides
-
Job sheets
-
External reference pages
-
Customer or supplier portals
This article also explains the three link actions shown next to a saved link:
-
Edit the Link
-
Share the Link
-
Delete the Link
Prerequisites
Before you begin, ensure:
-
You are logged in to Perspio
-
You have WRITE permission to the Asset Inspector module
-
You have permission to view and update the relevant Asset
-
You have the URL/link you want to add to the asset
How to Add a Link to an Asset in Perspio Inspector
Step 1: Open the Inspector module
From the Perspio main navigation, click Inspector.
What this screen does
-
Opens the Inspector workspace where asset records can be viewed and managed.
Screen controls
-
Inspector (menu item): Opens the Inspector module
-
Depending on your tenant setup, you may also see search and filter controls

Step 2: Open the relevant asset record
Click the asset record you want to update (example shown: 133…).
What this screen does
-
Opens the selected asset record so you can view details and manage links.
Screen controls
-
Record row / asset ID: Opens the selected asset record
-
The asset usually opens in a drawer/panel

Step 3: Open the links panel
In the asset drawer, click the links indicator/control (example shown as 1).
What this screen does
-
Opens the links panel for the selected asset record.
-
The number typically indicates how many links are already attached to the asset.
Screen controls
-
Links icon / count badge (e.g., 1): Opens the links panel for the asset
Usability note
-
If no links exist yet, this may show 0 or a different icon depending on your tenant/version.

Step 4: Click Add Link
Click Add Link to create a new link entry.
What this screen does
-
Opens the link entry form so you can add a URL and a label/name for the asset link.
Screen controls
-
Add Link: Starts the add-link workflow for the asset

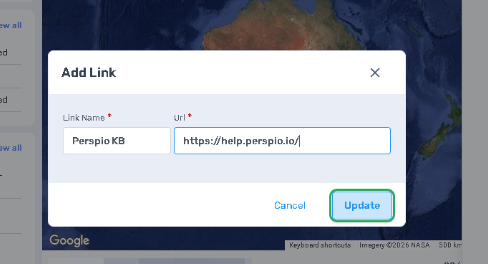
Step 5: Enter the link details and click Update
Enter the link details (for example, a title and URL), then click Update.
What this screen does
-
Saves the link to the selected asset record.
Screen controls
-
Link fields: Used to enter or paste the link details (such as URL and display name)
-
Update: Saves the link to the asset record
Usability notes
-
Use a clear, descriptive name so users know what the link is (for example, Service Manual, Perspio KB – Calibration Guide, or OEM Support Page)
-
Confirm the URL is correct before saving
Step 6: Confirm the link appears on the asset record
After saving, confirm the link is visible in the links panel (example shown: Perspio KB…).
What to check
-
The new link appears in the list for the correct asset record
-
The link text is clear and easy to identify
-
The link opens the expected destination
-
The action icons are visible next to the link
Important: Link action icons (left to right after the link)
The three icons shown after the link are:
-
Edit: Update the link name or URL
-
Share: Share/copy the link
-
Delete: Remove the link from the asset record

Troubleshooting
I cannot see the links option
-
Confirm the asset drawer is open
-
Check your permissions for viewing/editing asset links
-
Refresh the page and reopen the asset record
The link does not save
-
Confirm the URL is entered correctly
-
Make sure required fields are completed before clicking Update
-
Refresh the page and try again
The link appears, but opens the wrong page
-
Use the Edit icon to correct the URL
-
Confirm the full URL was entered correctly (including
https://if required)
I accidentally deleted a link
-
Re-add the link using Add Link
-
If needed, retrieve the URL from your source documentation or browser history
Notes
-
Links are attached to the specific asset record you opened
-
Use links to share important information directly on the asset record for faster access by operations, service, and support teams
-
The three action icons next to each saved link are Edit, Share, and Delete (in that order)